
Ever wondered if it’s possible to rename your existing FMA Site Database without making a complete mess of your environment? No?? It turns out it’s a relatively simple matter, but one that requires a few more steps then you might initially think…
Before running through the steps, let’s quickly recap how to change the logical Site name, as represented through Citrix Studio/PowerShell (PoSH) and, at the same time, make a clear distinction between the logical Site name and the actual Site Database name itself.
Changing the logical Site name is very easy and can be done through PoSH by running Set-ConfigSite -SiteName %Site Name%
Example: Set-ConfigSite -SiteName Education

Once changed through PoSH of course, Citrix Studio will also display the new logical site name:

Now that we know how to go about changing the logical Site name, lets take it one step further and look at the steps required to rename the Site Database itself:
Step 1: Disconnect all Controllers/FMA Service instances from the Site Database using the Set-%ServiceAlias%DBConnection -DBConnection $null string.
Tthis can be done manually for each service instance on all Controllers by replacing %ServiceAlias% with the actual FMA service aliases, but to make things a little easier, you can use a simple script similar to the one below:
Example Script:
#Turn off all active Controllers in the Site by resetting all service connection strings to DBUnconfigured.
$controllers = Get-BrokerController | %{$_.DNSName}
foreach ($controller in $controllers) {
Write-Host “Re-setting service DBConnection strings to a DBUnconfigured state & Turning off Controller $controller …” -ForegroundColor white -BackgroundColor DarkGreen
” “
” “
Set-HypDBConnection –DBConnection $null –AdminAddress $controller
Set-AcctDBConnection –DBConnection $null –AdminAddress $controller
Set-ProvDBConnection –DBConnection $null –AdminAddress $controller
Set-EnvTestDBConnection –DBConnection $null –AdminAddress $controller
Set-MonitorDBConnection –DBConnection $null –AdminAddress $controller
Set-SFDBConnection –DBConnection $null –AdminAddress $controller
Set-AnalyticsDBConnection –DBConnection $null –AdminAddress $controller
Set-BrokerDBConnection –DBConnection $null –AdminAddress $controller
Set-ConfigDBConnection –DBConnection $null –AdminAddress $controller
Set-LogDBConnection –DBConnection $null –AdminAddress $controller -force
Set-AdminDBConnection –DBConnection $null –AdminAddress $controller -force
” “
” “
}
IMPORTANT: Note the use of the -force switch in the above example which was first introduced in XD 7.1 to allow administrators forcibly set the Database Connection strings per service under certain circumstances when dependent services are not configured correctly.
Usage Example: Single Controller where the Configuration service has been un-configured without a second Controller and a peer Configuration service to complete the script and facilitate setting the Configuration Logging and Delegated Administration service to a DBUnconfigured state.
Example Output: disconnect.ps1

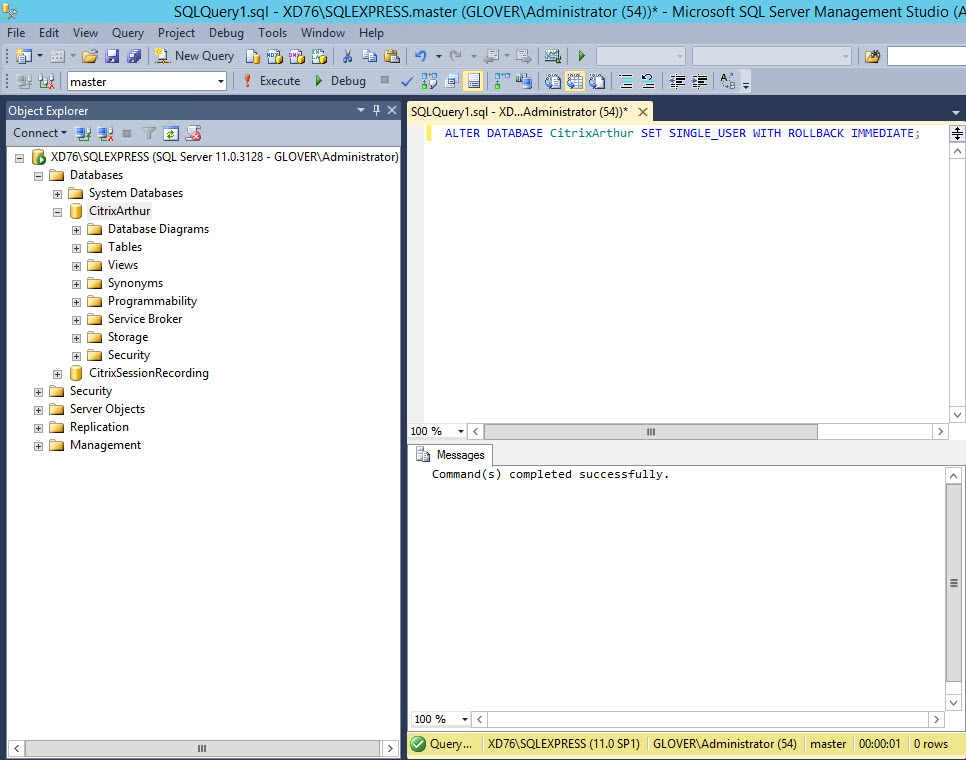
Step 2: Set the Database to User Mode and rename accordingly…
Run the following two queries in order from within SQL Server Management Studio, closing each new query window when complete.
Example: Set existing Database %CitrixArthur% to Single User mode:
1. ALTER DATABASE CitrixArthur SET SINGLE_USER WITH ROLLBACK IMMEDIATE;
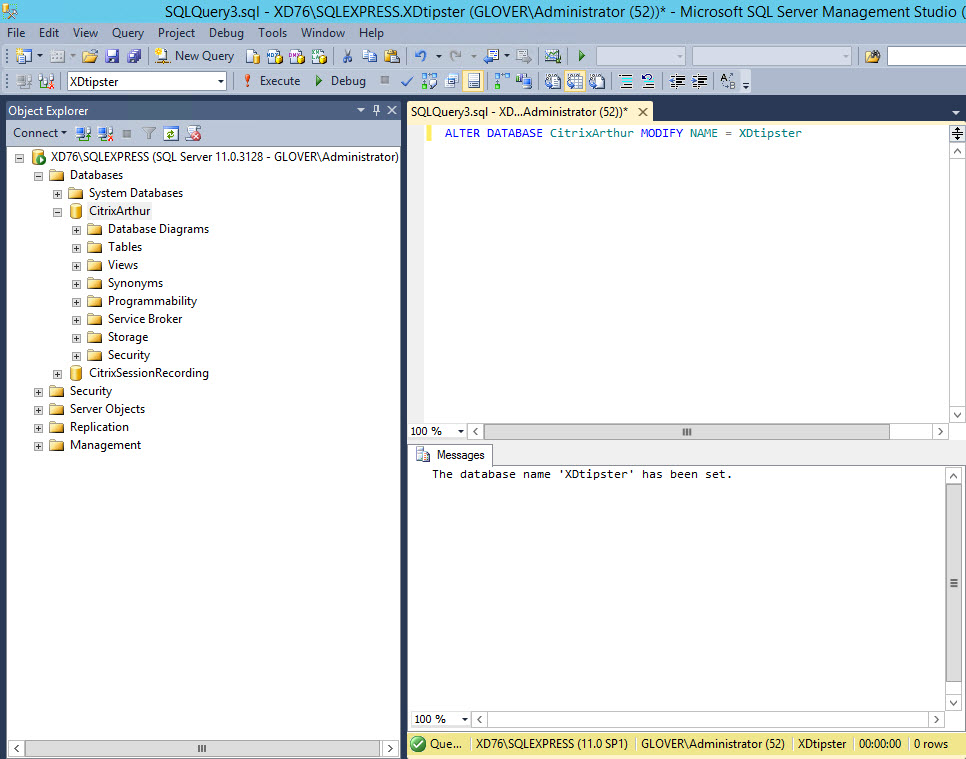
Example: Rename existing Database %CitrixArthur% to %XDtipster%:
2. ALTER DATABASE CitrixArthur MODIFY NAME = XDtipster
Step 3: Set the Database back to Multi User mode…
Example: Set the newly renamed Database %XDtipster% back to Multi User mode:
ALTER DATABASE XDtipster SET MULTI_USER WITH ROLLBACK IMMEDIATE;
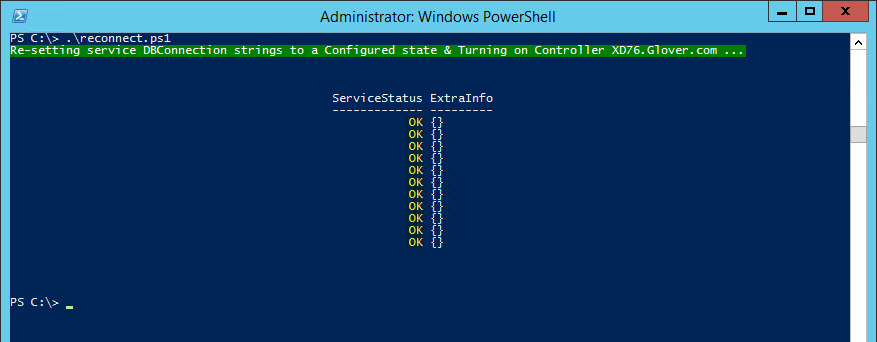
Step 4: Reconnect all Controllers/FMA Service instances to the the Site Database using the Set-%ServiceAlias%DBConnection -DBConnection %String%:
Another step, another simple script to make your life easier…
Example Script:
#Turn on all Controllers in the Site by setting the DBConnection strings for all service instances.
$controllers = “XD76.Glover.com”
foreach ($controller in $controllers) {
Write-Host “Re-setting service DBConnection strings to a Configured state & Turning on Controller $controller …” -ForegroundColor white -BackgroundColor DarkGreen
” “
” “
Set-AdminDBConnection -DBConnection “Server=XD76\SQLEXPRESS;Initial Catalog = XDtipster; Integrated Security =True” –AdminAddress $controller
Set-LogDBConnection -DBConnection “Server=XD76\SQLEXPRESS;Initial Catalog = XDtipster; Integrated Security = True” –AdminAddress $controller
Set-BrokerDBConnection -DBConnection “Server=XD76\SQLEXPRESS;Initial Catalog = XDtipster; Integrated Security =True” –AdminAddress $controller
Set-ConfigDBConnection -DBConnection “Server=XD76\SQLEXPRESS;Initial Catalog = XDtipster; Integrated Security = True” –AdminAddress $controller
Set-HypDBConnection -DBConnection “Server=XD76\SQLEXPRESS;Initial Catalog = XDtipster; Integrated Security = True” –AdminAddress $controller
Set-AcctDBConnection -DBConnection “Server=XD76\SQLEXPRESS;Initial Catalog = XDtipster; Integrated Security = True” –AdminAddress $controller
Set-ProvDBConnection -DBConnection “Server=XD76\SQLEXPRESS;Initial Catalog = XDtipster; Integrated Security = True” –AdminAddress $controller
Set-EnvTestDBConnection -DBConnection “Server=XD76\SQLEXPRESS;Initial Catalog = XDtipster; Integrated Security =True” –AdminAddress $controller
Set-MonitorDBConnection -DBConnection “Server=XD76\SQLEXPRESS;Initial Catalog = XDtipster; Integrated Security = True” –AdminAddress $controller
Set-SfDBConnection -DBConnection “Server=XD76\SQLEXPRESS;Initial Catalog = XDtipster; Integrated Security = True” –AdminAddress $controller
Set-AnalyticsDBConnection -DBConnection “Server=XD76\SQLEXPRESS;Initial Catalog = XDtipster; Integrated Security = True” –AdminAddress $controller
” “
” “
}
Example Output: reconnect.ps1
So, there you have it. Pretty straightforward once you know how…. 🙂
Known Issue: When you use the PowerShell SDK to change a Site name (set-configsite -sitename “change name”), you will receive an error if you attempt to join another Controller to the Site. As a workaround, rename the Site to its original name (to match the ServiceGroupName on the output of Get-ConfigRegisteredServiceInstance) before joining the new Controller to the Site. After joining the Site, you can rename the Site again. [#386919]
Best Regards,
Mick Glover (aka XD Tipster)
Senior Readiness Specialist,
Worldwide Support Readiness [EMEA]
Citrix Systems, Inc
Follow @xdtipster